Elastic Container Service
Elastic Container Service (ECS) is a lightweight container orchestration system. Much simpler than Kubernetes (EKS), ECS enables you to host containers leveraging the FARGATE platform for easy deployment and automatic resiliency.
Prerequisites
Section titled “Prerequisites”Subnets for Zone Redundancy
Section titled “Subnets for Zone Redundancy”You’ll want to first create a pair of subnets in the VPC of your choice to
handle the availability options for your ECS cluster. These can be small,
depending on how many replicas you need, but you’ll want at least two of them,
in two different availability zones (us-west-2a/us-west-2b). See our
subnets guide on how to set these up.
Application Load Balancer
Section titled “Application Load Balancer”You’ll want to pre-create an Application Load Balancer (ALB) if you don’t want to expose your containers directly to the internet. You’ll attach your ECS service to this ALB. See our Application Load Balancer guide for more information.
Security Group for Firewall
Section titled “Security Group for Firewall”You’ll want to pre-create a security group specific to your application’s incoming port needs. You can
Creating your Elastic Container Service
Section titled “Creating your Elastic Container Service”ECS works by first configuring a cluster, then you’ll register a service in that cluster to run your container in a variety of ways.
Creating the Cluster
Section titled “Creating the Cluster”In the AWS portal, search for Elastic Container Service and open that app. You’ll be presented with a list of clusters. Click Create cluster at the top right.
Provide a Cluster name and leave the rest default.
Back at the list of clusters, click on your new cluster to be presented with the cluster dashboard.
Creating the Task definition
Section titled “Creating the Task definition”You can think of the task definition as a manifest for how your service should run.
At the top right, click Create new task definition.
Give it a Task definition family name, adjust and of the Task size parameters like CPU or Memory, then in the Task execution role field, if you don’t already have one, click the dropdown and select Create new role.
In the container section, you’ll give your container a Name, the ECR_URI we configured in the Elastic Container Registry guide.
Don’t worry about enabling Private registry authentication, the previous Task execution role should allow ECS to pull image from your ECR.
On my app, it listens on port 8080, so I’ll change the Container port to
that.
You can adjust resource allocation limits if you need.
I like to leave the log collection as the defaults. It’s nice to get my container logs in CloudWatch.
You might want to configure a Restart policy, it’s as simple as checking the Enable Restart policy toggle button.
For storage, I need to mount a persistent volume at /myapp/data, so I’ll click
the Add volume button. give it a name like myapp_data, leaving the rest
default. Now click Add mount point, select your container from the dropdown,
then in my case, I’ll use /myapp/data in the Container path field.
Finally, click Create.
Creating the Cluster Service
Section titled “Creating the Cluster Service”Next, you’ll want to create a new service for your cluster. Click the Create button on the top right of the services pane.
There’s a lot of options here, and it’s good to investigate them all. For the purpose of this guide, I want the following architecture:
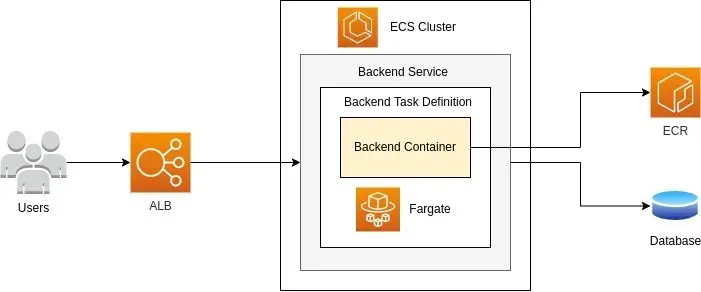
In the compute configuration section we will keep it set to Capacity provider strategy, using the default capacity provider of FARGATE.
Under the deployment configuration block, we’ll use the application type Service, to indicate that this is a service we want running at all times, unlike a Task which runs once and stops. The Family will be the name of the task definition family you previously created and the Service name can be whatever you’d like.
In the Networking block, I’ll configure mine to live in my default VPC and select the two subnets I created in the Prerequisites section.
Select the security group you created that allows traffic from your Application Load Balancer (TODO), and disable Public IP, as we’re going to connect this behind the ALB.
Expand the Load balancing box and check the Use load balancing checkbox. Check the Use an existing load balancer radio box and select the ALB you created from the dropdown. Select the Use an existing listener and select the available listener. Select Use an existing target group and select the target group you created.
Finally, at the bottom, click the Create button.
(TODO) iron out the security group settings to allow traffic from the ALB to the app.
(TODO) figure out how to do HTTPS redirects in the UI